En "Security Frabric" -> Automation:
Crear una nueva "Action" de tipo CLI Script:

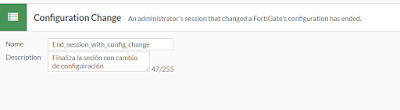
Crear un Trigger de tipo "Configuration Change"
Crear Stich

En "Security Frabric" -> Automation:
w32tm /config /manualpeerlist:hora.roa.es,0x8 /syncfromflags:manual /reliable:yes /update
si fuesen más de uno añadir a la lista como:
w32tm /config /manualpeerlist:hora.roa.es,0x8 servidor2,0x8 ...
w32tm /query /status
w32tm /config /syncfromflags:DOMHIER /update
w32tm /resync /nowait
net stop w32time && net start w32time
Verificar:
w32tm /query /status
w32tm /monitor
En este caso usaremos una cabina synology a la que denominaremos NAS01 y con IP 10.10.10.10:
# iscsiadm -m discovery -t st -p 10.10.10.10

10.10.10.10:3260,1 iqn.2000-01.com.synology:NAS01.default-target.669579eed99

# iscsiadm -m node --login

Logging in to [iface: default, target: iqn.2000-01.com.synology:NAS01.default-target.669579eed99, portal: 10.10.10.10,3260]

Login to [iface: default, target: iqn.2000-01.com.synology:NAS01.default-target.669579eed99, portal: 10.10.10.10,3260] successful.

# iscsiadm -m session -o show
tcp: [2] 10.10.10.10:3260,1 iqn.2000-01.com.synology:NAS01.default-target.669579eed99 (non-flash)
## fdisk -l Disk /dev/sda: xxxxx GiB, xxxx bytes, xxx sectors Disk model: MODELO Units: sectors of 1 * 512 = 512 bytes Sector size (logical/physical): 512 bytes / 512 bytes I/O size (minimum/optimal): 512 bytes / 512 bytes Disklabel type: gpt Disk identifier: 370... Device Start End Sectors Size Type /dev/sda1 XXX XXX [...] Disk /dev/sdb: [...] [...] Disk /dev/sdc: 10 TiB, 10995116277760 bytes, 21474836480 sectors Disk model: Storage Units: sectors of 1 * 512 = 512 bytes Sector size (logical/physical): 512 bytes / 512 bytes I/O size (minimum/optimal): 512 bytes / 512 bytes #
# zpool create -f NAS01LUNBCK01 /dev/sdc


# zpool list
NAME            SIZE  ALLOC   FREE  CKPOINT  EXPANDSZ   FRAG    CAP  DEDUP    HEALTH  ALTROOT
NAS01LUNBCK01  9.98T   106K  9.98T        -         -     0%     0%  1.00x    ONLINE  -
#
# iscsiadm --mode session
tcp: [2] 10.10.10.10:3260,1 iqn.2000-01.com.synology:NAS01.default-target.669579eed99 (non-flash)
# iscsiadm --mode node -T iqn.2000-01.com.synology:NAS01.default-target.669579eed99 -p 10.10.10.10 -o update -n node.startup -v automatic
# iscsiadm --mode node -T iqn.2000-01.com.synology:NAS01.default-target.669579eed99 -p 10.10.10.10 -o update -n node.conn[0].startup -v automatic
# To request that the iscsi initd scripts startup a session set to "automatic".
node.startup = automatic
#
# To manually startup the session set to "manual". The default is manual.
#node.startup = manual
# systemctl list-units --all --full | grep disk | grep 10.10.10.10 | egrep -v "*part*"
  dev-disk-by\x2dpath-ip\x2d10.10.10.10:3260\x2discsi\x2diqn.2000\x2d01.com.synology:NAS01.default\x2dtarget.669579eed99\x2dlun\x2d1.device          loaded    active   plugged   Storage
# cat zpooliscsi.service
[Unit]
After=dev-disk-by\x2dpath-ip\x2d10.10.10.10:3260\x2discsi\x2diqn.2000\x2d01.com.synology:NAS01.default\x2dtarget.669579eed99\x2dlun\x2d1.device

[Service]
ExecStart=/usr/sbin/zpool import NAS01LUNBCK01
ExecStartPost=/usr/bin/logger "Inciaiado el Pool ZFS NAS01LUNBCK01"

[Install]
WantedBy=dev-disk-by\x2dpath-ip\x2d10.10.10.10:3260\x2discsi\x2diqn.2000\x2d01.com.synology:NAS01.default\x2dtarget.669579eed99\x2dlun\x2d1.device

#systemctl daemon-reload
# systemctl enable zpooliscsi
Created symlink /etc/systemd/system/dev-disk-by\x2dpath-ip\x2d172.16.250.201:3260\x2discsi\x2diqn.2000\x2d01.com.synology:NAS01.default\x2dtarget.669579eed99\x2dlun\x2d1.device.wants/zpooliscsi.service → /etc/systemd/system/zpooliscsi.service.
# systemctl restart zpooliscsi
tail -f fichero.log
Get-Content "fichero.log" -Wait
tail -f fichero1.log fichero.log
Get-Content "fichero1.log","fichero2.log" -Wait
Get-Content "*.log" -Wait
Get-Content "*.logs" -Exclude "TS*.log","x.log","*202001*" -Wait
tail -n 10 fichero.log
Get-Content fichero.log -Tail 10
head -n 10 fichero.log
Get-Content "c:\important.log" -Head 10
find . -name *.txt
Get-ChildItem -Path "." -Recurse -Filter "*.txt" | Format-Table FullName
 Get-ChildItem -> gci
 Get-Content -> gc
 Select-String -> sls
 Format-Table -> ft
apt-get install openfortivpn
Crear fichero de configuracion /etc/openfortivpn/config
# config file for openfortivpn, see man openfortivpn(1)
host = hostquesea.tld
port =443
username = usuario
password = clave
persistent = 30
 openfortivpn -c /etc/openfortivpn/config
ERROR:  Gateway certificate validation failed, and the certificate digest in not in the local whitelist. If you trust it, rerun with:
ERROR:      --trusted-cert aaaaaabbbbbcccccccdddddeeeeffffaaaaaa0000111122233334445556a7bcd
ERROR:  or add this line to your config file:
ERROR:      trusted-cert = aaaaaabbbbbcccccccdddddeeeeffffaaaaaa0000111122233334445556a7bcd
ERROR:  Gateway certificate:
ERROR:      subject:
ERROR:          O=Fortinet Ltd.
ERROR:          CN=FortiGate
ERROR:      issuer:
ERROR:          O=Fortinet Ltd.
ERROR:          CN=FortiGate
ERROR:      sha256 digest:
ERROR:          aaaaaabbbbbcccccccdddddeeeeffffaaaaaa0000111122233334445556a7bcd
INFO:   Closed connection to gateway.
ERROR:  Gateway certificate validation failed, and the certificate digest in not in the local whitelist. If you trust it, rerun with:
ERROR:      --trusted-cert aaaaaaabbbbbcccccccdddddeeeeffffaaaaaa0000111122233334445556a7bcd
ERROR:  or add this line to your config file:
ERROR:      trusted-cert = aaaaaabbbbbcccccccdddddeeeeffffaaaaaa0000111122233334445556a7bcd
ERROR:  Gateway certificate:
ERROR:      subject:
ERROR:          O=Fortinet Ltd.
ERROR:          CN=FortiGate
ERROR:      issuer:
ERROR:          O=Fortinet Ltd.
ERROR:          CN=FortiGate
ERROR:      sha256 digest:
ERROR:          aaaaaabbbbbcccccccdddddeeeeffffaaaaaa0000111122233334445556a7bcd
INFO:   Could not log out.
# config file for openfortivpn, see man openfortivpn(1)
host = hostquesea.tld
port =443
username = usuario
password = clave
persistent = 30
trusted-cert = aaaaaabbbbbcccccccdddddeeeeffffaaaaaa0000111122233334445556a7bcd
cat openfortivpn.service
[Unit]
Description=Cliente OpenForti VPN
Wants=network-online.target
After=network.target

[Service]
Type=simple
Environment=EMAIL_ADDR=root
ExecStart=/usr/bin/openfortivpn -c /etc/openfortivpn/config
User=root
Group=root
StandardInput=tty
StandardOutput=tty
TTYPath=/dev/tty7

[Install]
WantedBy=multi-user.target
systemctl daemon-reload
systemctl enable openfortivpn
systemctl start openfortivpn
Ver interfaces, cerrar sesión y eliminar
iscsiadm -m node --print --interface

iscsiadm -m node -T <iqn> -p <IP>:<PUERTO> -u

iscsiadm -m node -o delete -T <iqn>
iscsiadm -m session
Partimos de que tenemos dos URL de los sitios donde se va a descargar la aplicación:
For comment: Zabbix Share - Proxmox VMs Backup Status Template
The comment is still in pending status, I paste it here:
Hi,
I have modified the status script to process several backup storages for different jobs. If you have only a job backup the script works as original.
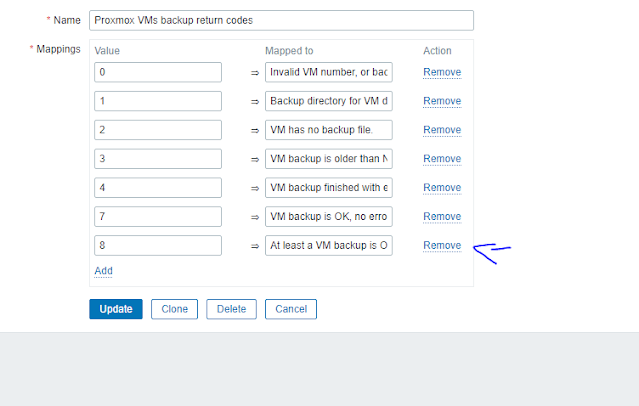
I have added an 8th status: 8 => At least a VM backup OK, but not all. Thus, we know that at least a backup is ok, but not all our jobs were successfully executed.
[....]
The definition of the 8th state trigger prototype:
Name: At least a VM backup for VM {#VM_NUMBER} OK, but not all
Expression: {Template App Proxmox VMs Backup Status:proxmox-vms-backup-status[{#VM_NUMBER},{$BACKUP_PERIOD}].last()}=8
Add value mapping description 8 mapped to "At least a VM backup is OK, but not all"
Modified script:
#!/bin/bash

# Script for checking ProxMox virtual machines backup. For use in Zabbix. Skygge@2016
# Modified: MR_Andrew, 2018. Fran Couñago, 2021
# Special thanks: Max Dark, Marinero from cyberforum.ru

#Variables

backupconfig='/etc/pve/vzdump.cron'
storageconfig='/etc/pve/storage.cfg'
configdir='/etc/pve/local/qemu-server'

# Check every VM for existing backup files and check if they're newer than 7 days

mapfile -t bckstorarray < <( awk  -v vm=$1 '$0 ~ vm {for(i=1;i<NF;i++) {if( $i ~ /--storage/) print $(i+1)}}'  $backupconfig|sort|uniq)
# read physical backup path from storage configuration file for VM $1
if [ ${#bckstorarray[@]} = 0 ]; then
	#echo "Invalid VM number, or backup for VM $1 is not configured."
	echo 0
else
	#Array with multiple errors
	ONEBAD=0
	ONEGOOD=0
	for backupstorage in "${bckstorarray[@]}"
	do
		backupdirectory=`cat $storageconfig|grep -w -A 1 $backupstorage|grep path|rev|cut -d " " -f 1|rev`
		#echo BCKDIR=$backupdirectory
		if [ -d $backupdirectory/dump ]; then
				# check if backup file(s) exists on backup path for VM $1
				backup=`ls $backupdirectory/dump/|grep "$1" |grep -v -E "log|tmp|dat"|wc -l`
				if [ "$backup" = "0" ]; then
					#echo "VM $1 has no backup file."
					ONEBAD=2
				else
					# check if backup file is newer than $2 day(s) for VM $1
					newbackup=`find $backupdirectory/dump/ -type f -name "*$1*" -not -name "*.log" -not -name "*.tmp" -not -name "*.dat" -mtime -$2 | sort -nr | head -1|wc -l`
						if [ "$newbackup" = "0" ]; then
							#echo "VM $1 backup is older than $2 day(s)."
							ONEBAD=3
						else
								#check last log file for errors
								backuplastlog=`ls $backupdirectory/dump/ | grep "$1" | grep log | tail -1`
								backupresult=`cat $backupdirectory/dump/$backuplastlog | grep -i -E "ERROR|FAILED"`
										if [ "$backupresult" = "" ];then
												#echo "VM $1 backup is OK, no errors found."
												ONEGOOD=1
										else
												#echo "VM $1 backup finished with errors. Please, check logs."
												ONEBAD=0
										fi
						fi
				fi
		else
			#echo "Backup directory for VM $1 does not exists."
			ONEBAD=1
		fi
	done
	if [ $ONEGOOD = 1 ]; then
		if [ $ONEBAD != 0 ] ; then
			echo 8
		else
			echo 7
		fi
	else
		echo $ONEBAD
	fi
fi
Add Trigger Prototype:
Abrir la Xbox Game Bar: [Windows]+[G]
Grabar directamente: [Windows]+[Alt] + [R]
El fichero de configuración de RDP (una vez salvado) se puede editar con un fichero de texto, en este fichero si hemos puesto la opción de usar todos los monitores para la sesión remota nos aparecerá una línea que pone:
use multimon:i:1
para seleccionar los monitores en concreto que queremos utilizar debemos añadir la línea:
selectedmonitors:s:1,2
donde 1 y 2 son los identificadores de los monitores, estos identificadores pueden obtenerse ejecutando
mstsc /l

Fuentes:
Usar Add-ApxPackage
Para todos los usuarios usar Add-ProvisionedAppPackage
Por ejemplo para añadir un paquete en la imagen de sistema operativo que estamos usando (ene este casno no requiere fichero de licnecia) se usa:
Add-ProvisionedAppPackage -Online -Skiplicense -PackagePath paquete.AppxPara ver los links de descarga fácimente https://store.rg-adguard.net/
Si tiene dependencias habría que ponerlas de la siguiente forma:
Add-ProvisionedAppPackage -Online -SkipLicense -PackagePath paquete.AppxBundle -DependencyPackagePath paquete1.Appx,paquete2.Appx,paqueten.Appx

